whatisthis?
생활코딩 WEB1 - html 편 (2/3) 본문
[태그,속성 그리고 웹사이트 완성!]
1-10. html이 중요한 이유
'기본이 중요하다.'
<span style="font-size:24px"> coding </span> 과
<h3> coding </h3> 는 우리 눈에 보이는 결과는 같다.

<span>의 style을 입힌 위에 coding은 그저 글의 내용일 뿐이고
아래의 <h3> 태그는 제목을 의미한다.
즉, 검색 엔진에 'coding'을 쳐봤을때 검색 엔진은 제목이 coding인 후자를 더 선택할 것임.
-> 검색 엔진의 중요성이 ★★★ 웹이 갖고 있는 본래의 의미는 '정보' -> 검색엔진을 통해 정보를 잘 검색할 수있도록
예를 들면 포토샵으로 글을 작성하면, 그 글에 포함된 정보는 검색을 통해 나타나지 않는다.
웹의 중요한 접근성.
신체적으로 불편함이 있는 사람들을 위해 정보를 잘 얻을 수 있도록.
(예- 포토샵 그림으로 글을 나타내면, 시각장애가 있는 분들은 그 내용을 읽을 수 없다)
1-11. 속성 & img태그
<img>태그는
태그의 이름(img)만으로는 정보가 부족함.
즉, <img>라고만 입력하면 아무 기능이 없음.
--> 속성을 사용.
ex- <img src="">
** src 속성은 source라는 뜻.
저작권 구애 없이 사진 얻을 수 있는 사이트
https://unsplash.com
Beautiful Free Images & Pictures | Unsplash
Beautiful, free images and photos that you can download and use for any project. Better than any royalty free or stock photos.
unsplash.com
<img src="photo.jpg">를 추가한 결과
** 단, html문서와 같은 폴더 안에 사진을 저장해야 한다.

사진 크기 조정하기.
<img src="photo.jpg" width="100%">
->알아서 100%로 조정됨.(창크기에따라서)

<img src="photo.jpg" width="100%">
=속성 =속성
-순서는 상관 없음!
1-12. 부모자식과 목록
<parent> 태그와 <child>태그 -> 부모자식 관계 (속해있는 것)
♡ 즉, 사이좋은 태그들 ♡
예-
1. Profile<br>
2. Like<br>
3. MyDream<br>

<li> = list 태그를 이용하자.
<li> _____ </li>로 나타내면
앞에 ●가 생기고, 줄 띄기가 자동으로 된다.
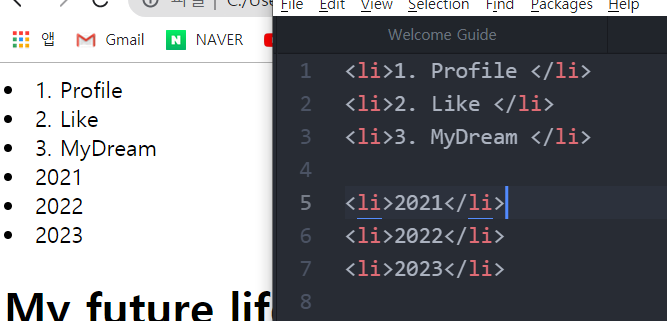
1.2.3과 아래 2021,2022,2023은 엄연히 다른 분류인데 구분이 안된다.
이때는 <li>태그의 부모태그인 <ul>을 사용하자.
<결과>
|
| <ul> <li>1. Profile </li> <li>2. Like </li> <li>3. MyDream </li> </ul> <ul> <li>2021</li> <li>2022</li> <li>2023</li> </ul> |
** <li>는 꼭 부모태그 <ul>과 함께 사용된다!
____
<ul>태그 대신 <ol>을 쓰자.
ol = ordered list (숫자 자동으로 써줌)
ul = unorderd list (숫자 없이)
| <ol> <li>Profile </li> <li>Like </li> <li>MyDream </li> </ol> |
 <ol>태그 사용 결과 |
1-13. 문서 구조
1. <title>태그 = 상단에 나타나는 웹페이지 제목을 의미.

2. <head>태그에서 쓸 것
<meta charset="utf-8"> -> 글씨 깨짐 방지. 우리가 아톰에서 utf-8로 작성하니까 맞춰줘야함.
* charset = character set(문자 설정)
| <!doctype html> <html> <head> <title> BE A FRONT-END DEVELOPER! </title> <meta charset="utf-8"> </head> <body> <ol> <li>Profile </li> <li>Like </li> <li>MyDream </li> </ol> <h1>My future life</h1> <p>I want to be a web <strong>front-end developer.</strong></p> <p style="margin-top:40px;">Since I was 17, I have liked computer games and I want to make it myself. Now, I want to <u>create a website</u> that is helpful to many people, not only games. I will be a developer who develops for everyone's convenience.</p> <img src="photo.jpg" width="100%"> <p>I respect all of the programmer and I learn programming languages by myself. I am not good at coding yet. But I will study hard everyday.</p> </body> </html> |
1-14. HTML 태그의 제왕
검색엔진이 존재할 수 있는 태그.
이 태그가 없다면 모든 웹페이지는 고립되고 정보 혁명이 이뤄지지 않을 것.
일상에서 100번도 넘게 사용되는 태그.
HTML = hypertext를 의미하는 태그.
anchor 의 첫 글자를 딴 <a>태그. (anchor n. 닻; v.정박하다)
- html에서 hypertext는 '링크'를 의미함.
html specification 이라 검색 -> https://www.w3.org/TR/html52/
HTML 5.2
Abstract This specification defines the 5th major version, second minor revision of the core language of the World Wide Web: the Hypertext Markup Language (HTML). In this version, new features continue to be introduced to help Web application authors, new
www.w3.org
<a href="https://mywebproject.tistory.com/"> </a>
<a>태그 또한 속성이 필요한 태그임. (이름 자체로는 아무 기능이 없음)
href = 하이퍼텍스트 레퍼런스 (h= 하이퍼텍스트 / ref=레퍼런스)
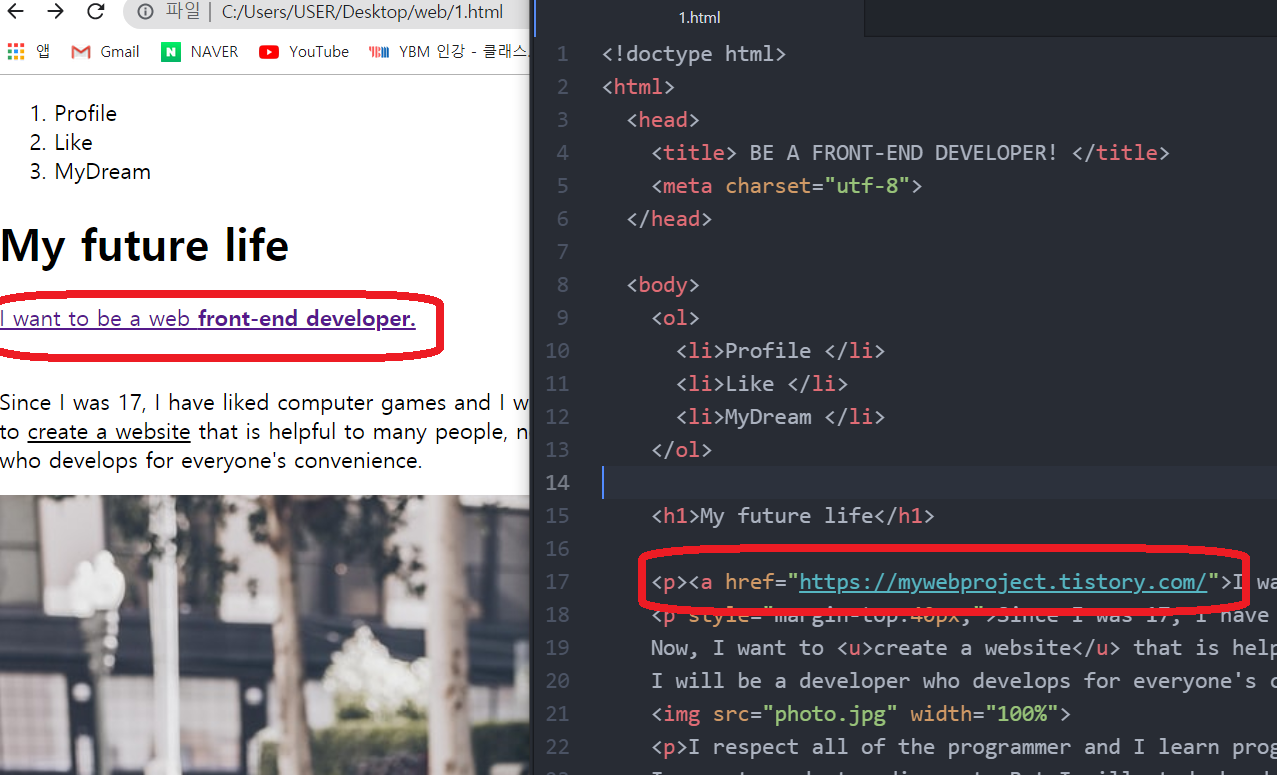
-> 해당 부분(즉, a태그 안에 속한 부분)을 클릭하면 https://mywebproject.tistory.com/ 로 이동하게 된다.
** 클릭했을때 새 탭으로 열리게 하려면
<a href="https://mywebproject.tistory.com/" target="_blank">

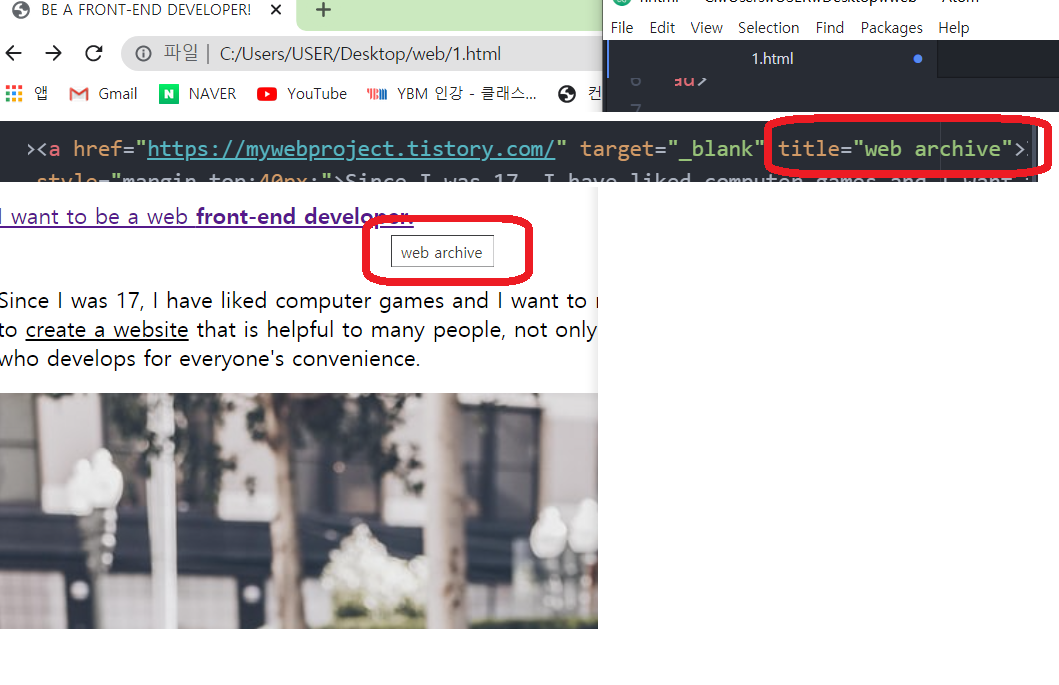
if> 새 창의 title이 뜨도록 하려면 (즉, a태그에 해당하는 부분 위에 마우스를 올리면 툴팁이 뜨도록 하려면)
<a href="https://mywebproject.tistory.com/" target="_blank" title="web archive">
1-15. 웹사이트 완성

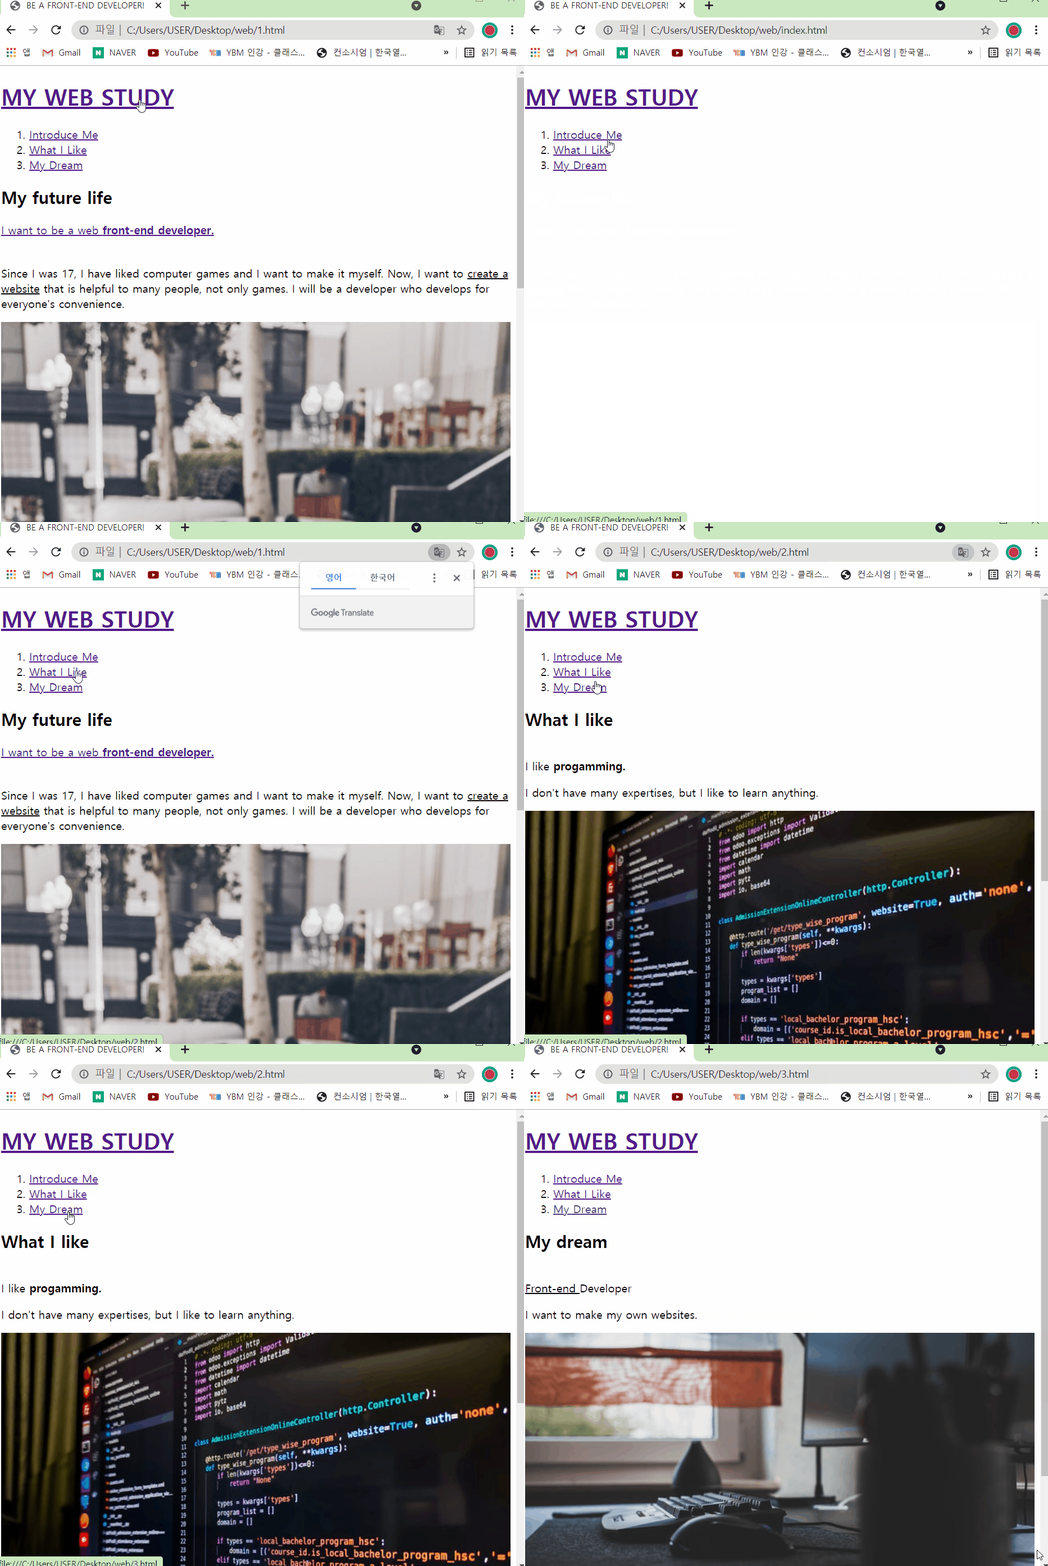
| <h1><a href="index.html">MY WEB STUDY</a></h1> <ol> <li><a href="1.html">Introduce Me</a></li> <li><a href="2.html">What I Like</a></li> <li><a href="3.html">My Dream</a></li> </ol> |
각 부분을 클릭하면 해당 문서로 이동하도록 링크를 걸어줌 (<a>태그와 href=""속성 사용)
** 내가 처음에 작성한 html 코드
| 2.html | 3.html |
| <!doctype html> <html> <head> <title> What I Like </title> <meta charset="utf-8"> </head> <body> <h1> What I like </h1> <p style="margin-top:40px;"> I like <strong>progamming.</strong> </p> <p> I don't have many expertises, but I like to learn anything. </p> <img src="photo2.jpg" width="100%"> <ul> <li>html</li> <li>css</li> <li>javascript</li> <li>React</li> <li>node.js</li> <li>web browser</li> </ul> </body> </html> |
<!doctype html> <html> <head> <title> My dream </title> <meta charset="utf-8"> </head> <body> <h1> My dream </h1> <p style="margin-top:40px;"> <u> Front-end </u> Developer </p> <p> I want to make my own websites. </p> <img src="photo3.jpg" width="100%"> </body> </html> |
-> 문제점 : 큰 제목(my web study)가 사라지고, 상단바의 웹사이트 제목이 바뀌고 (title태그)
메뉴바(ol태그 안에)의 링크가 사라져서 다른 번호를 누를 수 없다!
해결 : 1.html에서 작성했던 부분에서 공통적으로 사용해야 할 부분이 있구나!

** 1차 수정한 코드
| 2.html | 3.html | index.html (아직 미완) |
| <!doctype html> <html> <head> <title> BE A FRONT-END DEVELOPER! </title> <meta charset="utf-8"> </head> <body> <h1><a href="index.html">MY WEB STUDY</a></h1> <ol> <li><a href="1.html">Introduce Me</a></li> <li><a href="2.html">What I Like</a></li> <li><a href="3.html">My Dream</a></li> </ol> <h2> What I like </h2> <p style="margin-top:40px;"> I like <strong>progamming.</strong> </p> <p> I don't have many expertises, but I like to learn anything. </p> <img src="photo2.jpg" width="100%"> <ul> <li>html</li> <li>css</li> <li>javascript</li> <li>React</li> <li>node.js</li> <li>web browser</li> </ul> </body> </html> |
<!doctype html> <html> <head> <title> BE A FRONT-END DEVELOPER! </title> <meta charset="utf-8"> </head> <body> <h1><a href="index.html">MY WEB STUDY</a></h1> <ol> <li><a href="1.html">Introduce Me</a></li> <li><a href="2.html">What I Like</a></li> <li><a href="3.html">My Dream</a></li> </ol> <h2> My dream </h2> <p style="margin-top:40px;"> <u> Front-end </u> Developer </p> <p> I want to make my own websites. </p> <img src="photo3.jpg" width="100%"> </body> </html> |
<!doctype html> <html> <head> <title> BE A FRONT-END DEVELOPER! </title> <meta charset="utf-8"> </head> <body> <h1><a href="index.html">MY WEB STUDY</a></h1> <ol> <li><a href="1.html">Introduce Me</a></li> <li><a href="2.html">What I Like</a></li> <li><a href="3.html">My Dream</a></li> </ol> ************ 내용추가예정 ************** </body> </html> |
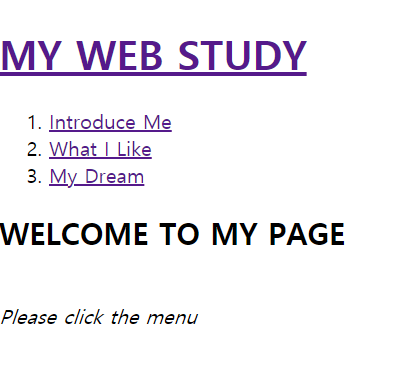
** index.html을 약간 수정해본 코드
<h2> WELCOME TO MY PAGE </h2>
<p style="margin-top:40px;"> <i>Please click the menu</i> </p>
'WEB STUDY > HTML,CSS' 카테고리의 다른 글
| 생활코딩 WEB2 - css 편 (1/3) (0) | 2021.08.21 |
|---|---|
| 생활코딩 WEB1 - html 편 (+α) (0) | 2021.08.20 |
| 생활코딩 WEB1 - html 편 (3/3) (0) | 2021.08.18 |
| 생활코딩 WEB1 - html 편 (1/3) (0) | 2021.08.16 |
| CH1. HTML 개요 (1) | 2021.07.26 |
