whatisthis?
220314 [TIL] Today I Learned 💯 React.js 본문
React.js Day 02
<> </> (=빈 태그)의 사용
리액트에서 단점이였던 것이
항상 컴포넌트를 <div>로 감싸줬어야 했다.

그러면, reactDOM으로 렌더링 했을때
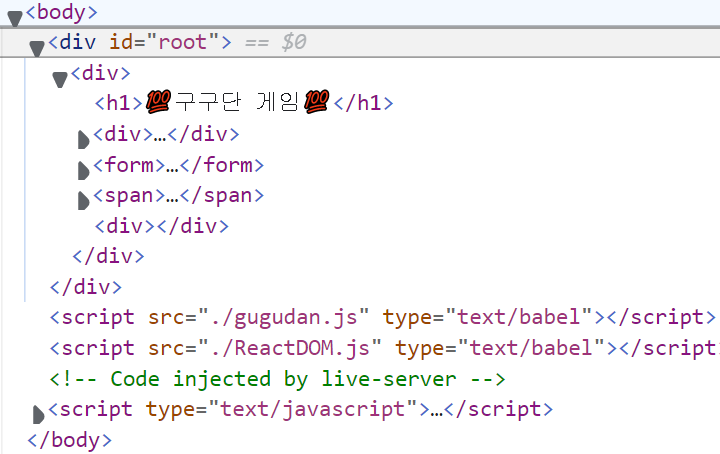
root>div>컴포넌트 이런식으로 쓸 데 없는 div가 생겨버리게 된다.
따라서, 이런 단점을 개선한 것이 바로
<> </>로 감싸주는 것.
1. 컴포넌트의 render 부분
 return (
  <>
    <h1>💯구구단 게임💯</h1>
    <div>
      📃 {this.state.first} 곱하기 {this.state.second} 는?
    </div>
    <form onSubmit={this.onFormSubmit}>
      <input
        type="number"
        required
        placeholder="정답 입력"
        value={this.state.value}
        onChange={this.onInputChange}
      />
      <button type="submit">입력</button>
    </form>
    <span>LOG 🔎 {this.state.line}</span>
    <div>{this.state.result}</div>
  </>
);
2. ReactDOM의 render 부분
ReactDOM.render(
  <>
    <GuGuDan />
  </>,
  document.querySelector("#root")
);

이런식으로 div#root 하위 div들이 하나도 없이 깔끔해진 모습이다.
🙋♂️ 원래는 어땠길래?
render() {
    return (
      <div>
        <h1>💯구구단 게임💯</h1>

        // 중략

      </div>
    );
  }
❗ 만약 빈 태그 <> </> 를 바벨이 처리 못하고 에러가 난다면?
<React.Fragment> </React.Fragment>
(나는 최신버전 바벨을 썼더니 <></>도 잘 실행됨)
❗❗❗ 중요 TIP들
1. 직접 선언한 함수는 꼭 arrow function으로! (this 바인딩을 위해)
2. constructor 없애고 , this.state말고 state로!
1/
onFormSubmit 같은 함수를 따로 빼서 정의할 떄는 반드시
화살표함수로 작성해야한다. this가 달라지기 때문.
🔻 이 두 함수. (클래스 메소드로 선언한 것)
onFormSubmit = e => {
  e.preventDefault();
  if (parseInt(this.state.value) === this.state.first * this.state.second) {
    this.setState({
      result: "⭕정답입니다",
      value: "",
      first: Math.ceil(Math.random() * 9),
      second: Math.ceil(Math.random() * 9),
      line:
        this.state.first +
        "*" +
        this.state.second +
        "=" +
        this.state.first * this.state.second,
    });
  } else {
    this.setState({ result: "❌틀렸습니다", value: "" });
  }
};

onInputChange = e => {
  this.setState({ value: e.target.value });
};
화살표 함수는 알아서 this를 바인딩해주기 때문에 this가 달라지는 문제가 해결됨.
직접 만들어준 함수들 (onFormSubmit과 onInputChange 메소드)
= 반드시 arrow function으로 써줘야한다.
this값이 달라지기 때문에.
render() { } 안에서 쓰는 함수들
<input onChange = { function (e) { console.log(e.target.value) } }
뭐 이런식으로 function으로 써도 되고, arrow function으로 써도 된다.
2/
class GuGuDan extends React.Component {
  constructor(props) {
    super(props);
    this.state = {
      first: Math.ceil(Math.random() * 9),
      second: Math.ceil(Math.random() * 9),
      value: "",
      result: "",
      line: "",
    };
  }
🔺 이렇게 constructor 쓰는 방식 말고도
🔻 이렇게 작성해도 된다!
(실무에선 이 방법을 더 많이씀)
class GuGuDan extends React.Component {
  state = {
    first: Math.ceil(Math.random() * 9),
    second: Math.ceil(Math.random() * 9),
    value: "",
    result: "",
    line: "",
  };
  // 이하 생략
- constructor 함수 없애고
- this.state가 아닌 state로 선언해줌
함수형 setState
this.setState(() => {
        return {
          result: "⭕정답입니다",
          value: "",
          first: Math.ceil(Math.random() * 9),
          second: Math.ceil(Math.random() * 9),
          line:
            this.state.first +
            "*" +
            this.state.second +
            "=" +
            this.state.first * this.state.second,
        };
      });
이런식으로 setState에 return 으로 변하는 값들을 넣어줌.
새로운 state를 리턴하는 함수를 넣어준 것.
이렇게 하면 뭐가 좋은거지?
this.setState((prevState) => {
        return {
          result: "⭕정답입니다",
          value: "",
          first: Math.ceil(Math.random() * 9),
          second: Math.ceil(Math.random() * 9),
          line:
            prevState.first +
            "*" +
            prevState.second +
            "=" +
            prevState.first * prevState.second,
        };
      });
prevState라고 매개변수를 정해줄 수 있음.
>> this.state를 대체한 것.
(즉, 여기선 prevState는 "예전값"을 의미)
state의 원 상태와 헷갈리지 않도록. 확실하게 구분짓기 가능.
🙋♂️ 함수형 setState를 언제 쓰는건지?
- setState안에 this.state(즉, 이전 state)가 들어가면
- 함수형으로 만들고, return { } 을 해주자!
ref
우리가 만든 예제를 보면,
form이 submit 될때마다 마우스로 input을 일일히 클릭해줘야 focus가 된다.
form이 submit 될때마다 자동으로 focus를 주려면?
우선, js 문법으로 HTMLelements.focus()를 이용하되,
리액트를 쓰고 있으므로
document.queryselctor()등은 쓰지말자!
step1 - 우선, input에 ref라는 속성을 주자.
<input
   ref={c => (this.input = c)}

   // 중략

/>
ref = { c => (this.input = c) }
c라는 값은 그냥 임의로 준 값이고,
this.input에 해당 값을 대입하라는 뜻임.
여기서 c는 DOM 엘리먼트를 의미함.
step2 - class에 input이라는 빈껍데기 변수를 만들자. (값 할당은 하지않은)
🔻 클래스 구조는 이런식임.
class GuGuDan extends React.Component {
  state = {
  // 중략
  }

  onFormSubmit = () => {
  // 중략
  }

  onInputChange = () => {
  // 중략
  }

  input;

  render() {
      return (
      // 중략
      )
   }
}
step3 - onFormSubmit에 .focus를 해줌
onFormSubmit = e => {
   if (parseInt(this.state.value) === this.state.first * this.state.second) {
      this.setState(prevState => {
        return {

          // 생략

        };
      });
      this.input.focus();        // 👈👈 이부분
    } else {
      this.setState ({
    // 생략
     });
     this.input.focus();        // 👈👈 이부분
   }
};
this.setState가 끝나면
this.input.focus()를 해주자.
ref에서 함수로 작성해서 임의의 변수 input에 값을 대입하고,
this.input.focus()를 해주는것.
🙋♂️ 결국 ref는 왜 쓰나요?
포커스, 텍스트 선택영역, 혹은 미디어의 재생을 관리할 때.
애니메이션을 직접적으로 실행시킬 때.
서드 파티 DOM 라이브러리를 React와 같이 사용할 때.
- DOM 엘리먼트를 저장하기 위해 ref를 생성함.
위에서는 ref를 함수로 정의해서 빈 값에 대입했음.
1️⃣콜백 ref
- ref에 콜백 함수를 전달함.
전달된 함수는 DOM 엘리먼트를 인자로 받음.
<input ref={this.setTextInputRef} />
- setTextInputRef 함수의 인자로 해당 input(element)가 가는것임.
this.setTextInputRef = element => { this.textInput = element; };
** 참고로, textInput은 처음엔 빈 값임. (값을 할당해주는 것)this.textInput = null;
그리고, 여기선 버튼을 누르면 인풋에 포커스가 가게 하는 예제임.
<button onClick={this.focusTextInput}>Click<button>
 this.focusTextInput = () => {
      // DOM API를 사용하여 text 타입의 input 엘리먼트를 포커스합니다.
      if (this.textInput) this.textInput.focus();
    };
  }
>> if(this.textInput)은 - 초기값이 null이므로 element가 잘 대입되었는지 체크하는것임
this.textInput.focus()를 해서
해당 요소를 포커스함.
2️⃣ 새로 추가된 React.createRef() 사용법
class CustomTextInput extends React.Component { constructor(props) { super(props); // textInput DOM 엘리먼트를 저장하기 위한 ref를 생성합니다. this.textInput = React.createRef(); this.focusTextInput = this.focusTextInput.bind(this); } focusTextInput() { // DOM API를 사용하여 명시적으로 text 타입의 input 엘리먼트를 포커스합니다. // 주의: 우리는 지금 DOM 노드를 얻기 위해 "current" 프로퍼티에 접근하고 있습니다. this.textInput.current.focus(); } render() { // React에게 우리가 text 타입의 input 엘리먼트를 // 우리가 생성자에서 생성한 `textInput` ref와 연결하고 싶다고 이야기합니다. return ( <div> <input type="text" ref={this.textInput} /> <input type="button" value="Focus the text input" onClick={this.focusTextInput} /> </div> ); } }
ref={this.textInput} 으로 해주고,
Class 부분에 this.textInput = React.createRef(); 해줌.
>> ref = {React.createRef() } 가 되는 셈.
'WEB STUDY > REACT' 카테고리의 다른 글
| 220315 [TIL] Today I Learned 💯 React.js - (2) (0) | 2022.03.15 |
|---|---|
| 220315 [TIL] Today I Learned 💯 React.js - (1) (0) | 2022.03.15 |
| 220313 [TIL] Today I Learned 💯 React.js (0) | 2022.03.13 |
| React. React JS - Cleanup function (0) | 2022.02.18 |
| React. React JS - Effects (2) Deps (0) | 2022.02.18 |


