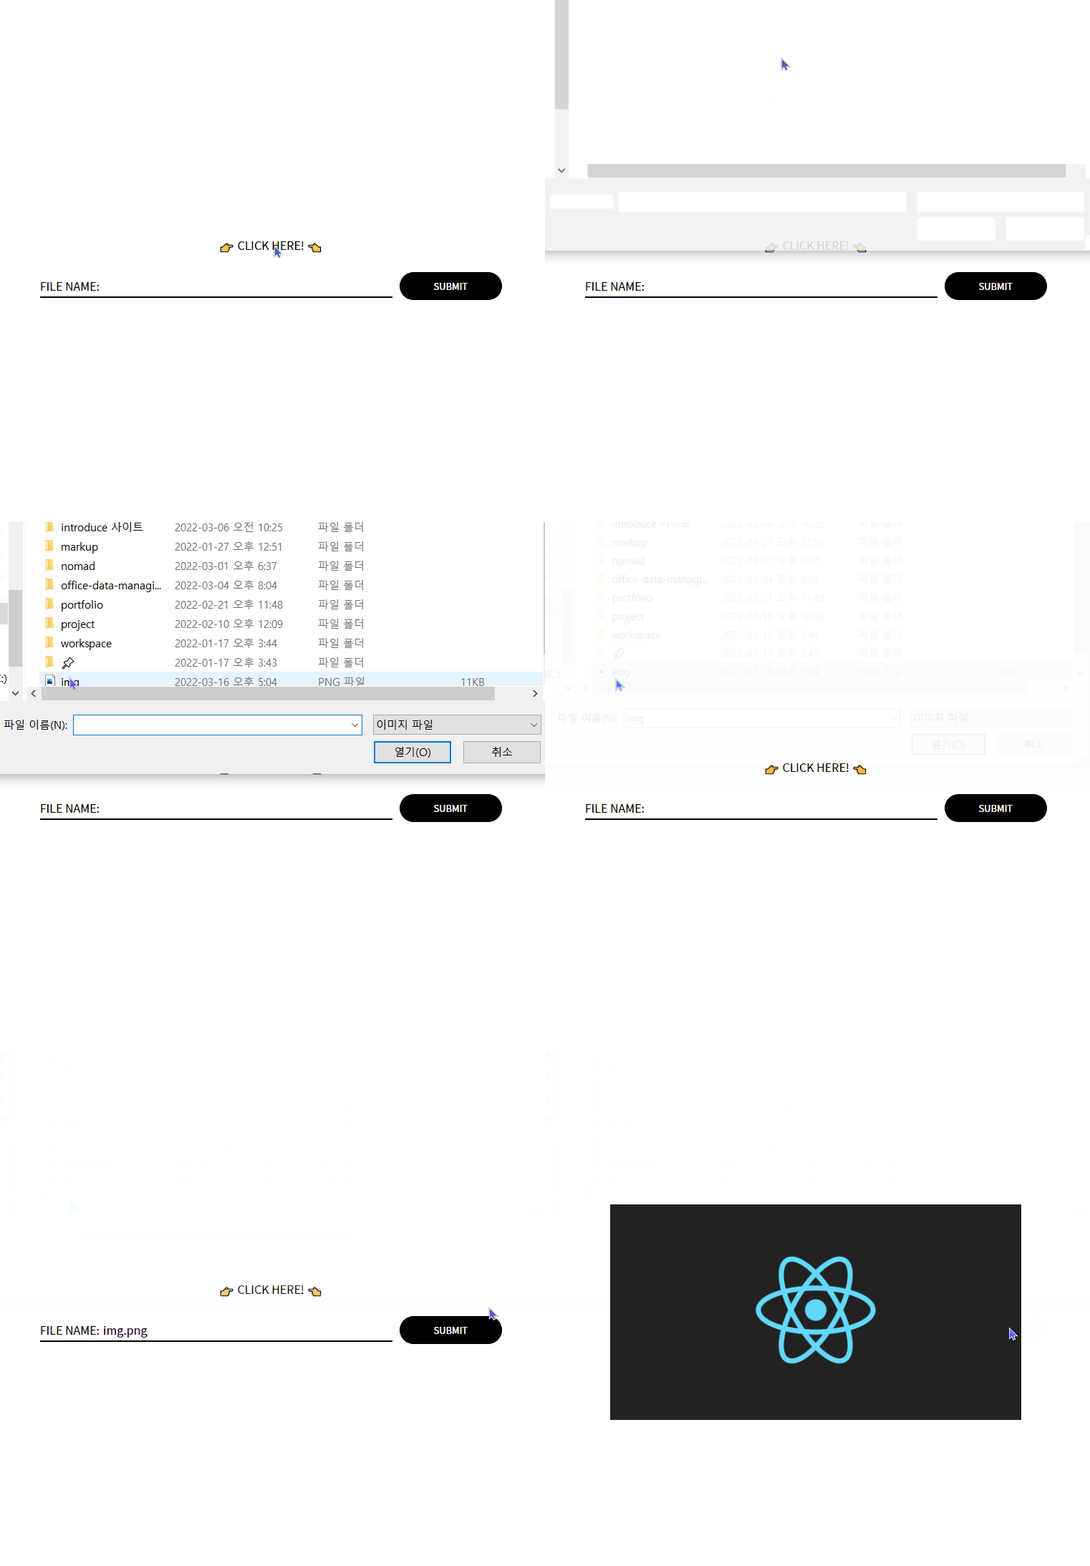
whatisthis?
practice) input="file" 커스터마이징 + 이미지 띄우기 본문
프로젝트를 진행하다가,
모바일 웹에서 input="file"로 이미지를 업로드해서
해당 게시글에 저장되도록 구현해야 하는 기능이 있었다.
물론 아직 세부 컴포넌트로 쪼개는중이라 구현은 못했지만,
대충 맛보기로 html-js 스택으로 저렴하게 구현하는 예제가 있길래 시도해봤다.
- 참고 : 워낙 간단한거라 css랑 js는 그냥 인라인으로 해두었다.

🔑 KEYPOINT !
<form method="post" enctype="multipart/form-data"> ... </form>
<input type="file" id="chooseFile" name="chooseFile" accept="image/*" onchange="loadFile(this)" />
newImage.src = URL.createObjectURL(file);
URL.createObjectURL() - Web API | MDN
URL.createObjectURL() 정적 메서드는 주어진 객체를 가리키는 URL을 DOMString으로 반환합니다.
developer.mozilla.org
- 객체 URL을 해제하려면 revokeObjectURL()을 호출
- 같은 객체를 사용하더라도, createObjectURL()을 매번 호출할 때마다 새로운 객체 URL을 생성합니다.
각각의 URL을 더는 쓰지 않을 땐 URL.revokeObjectURL()을 사용해 하나씩 해제해줘야 합니다.
❕ 이 기능은 메모리 누수의 가능성으로 인해 Service Worker에서 사용할 수 없습니다.
index.html
<!DOCTYPE html>
<html lang="en">
  <head>
    <meta charset="UTF-8" />
    <meta http-equiv="X-UA-Compatible" content="IE=edge" />
    <meta name="viewport" content="width=device-width, initial-scale=1.0" />
    <title>image</title>
    <style>
      html {
        height: 100%;
      }

      body {
        font-family: sans-serif;
        height: 100%;
        margin: 0;
      }

      .container {
        display: flex;
        height: 100%;
        flex-direction: column;
      }

      .image-upload {
        flex: 1;
        display: flex;
        flex-direction: column;
        justify-content: center;
      }

      .button {
        display: flex;
        justify-content: center;
      }

      label {
        cursor: pointer;
        font-size: 1em;
      }

      #chooseFile {
        visibility: hidden;
      }

      .fileContainer {
        display: flex;
        justify-content: center;
        align-items: center;
      }

      .fileInput {
        display: flex;
        align-items: center;
        border-bottom: solid 2px black;
        width: 60%;
        height: 30px;
      }

      #fileName {
        margin-left: 5px;
      }

      .buttonContainer {
        width: 15%;
        display: flex;
        justify-content: center;
        align-items: center;
        margin-left: 10px;
        background-color: black;
        color: white;
        border-radius: 30px;
        padding: 10px;
        font-size: 0.8em;

        cursor: pointer;
      }

      .image-show {
        z-index: -1;
        display: flex;
        justify-content: center;
        align-items: center;
        position: absolute;
        width: 100%;
        height: 100%;
      }

      .img {
        position: absolute;
      }
    </style>
  </head>
  <body>
    <div class="container">
      <div class="image-upload" id="image-upload">
        <form method="post" enctype="multipart/form-data">
          <div class="button">
            <label for="chooseFile"> 📁 Upload Image </label>
          </div>
          <input
            type="file"
            id="chooseFile"
            name="chooseFile"
            accept="image/*"
            onchange="loadFile(this)"
          />
        </form>

        <div class="fileContainer">
          <div class="fileInput">
            <p>FILE NAME:</p>
            <p id="fileName"></p>
          </div>
          <div class="buttonContainer">
            <div class="submitButton" id="submitButton">SUBMIT</div>
          </div>
        </div>
      </div>

      <div class="image-show" id="image-show"></div>
    </div>
    <script>
      const submit = document.getElementById("submitButton");
      submit.onclick = showImage; //Submit 버튼 클릭시 이미지 보여주기

      function showImage() {
        const newImage = document.getElementById("image-show").lastElementChild;
        newImage.style.visibility = "visible";

        document.getElementById("image-upload").style.visibility = "hidden";

        document.getElementById("fileName").textContent = null; //기존 파일 이름 지우기
      }

      function loadFile(input) {
        const file = input.files[0];

        const name = document.getElementById("fileName");
        name.textContent = file.name;

        const newImage = document.createElement("img");
        newImage.setAttribute("class", "img");

        newImage.src = URL.createObjectURL(file);

        newImage.style.width = "70%";
        newImage.style.height = "70%";
        newImage.style.visibility = "hidden"; //버튼을 누르기 전까지는 이미지 숨기기
        newImage.style.objectFit = "contain";

        const container = document.getElementById("image-show");
        container.appendChild(newImage);
      }
    </script>
  </body>
</html>
🔻 TRY IT! 🔻
FILE NAME:
🙋♀️ REFERENCE
minkyeong-ko (minkyeong ) - velog
[포트폴리오] 미니 포트폴리오 웹사이트 제작기 컴퓨터공학을 다중전공한 이후 여러 동아리와 팀 프로젝트,개인 프로젝트들을 나름 열심히 해왔지만뒤늦게 프론트엔드 개발자가 되겠다는 확실
velog.io
'PRACTICE > SELF' 카테고리의 다른 글
| practice) React.js - 틱택토(Tic Tac Toe) 게임 (0) | 2022.03.15 |
|---|---|
| practice - css ) BookStore UI (0) | 2022.03.12 |
| practice - css ) 슬라이드 페이지 - CSS only (JS❌) (0) | 2022.03.11 |
| practice - js ) 슬라이드 페이지 (2) 터치형(드래그) (0) | 2022.03.11 |
| practice - js ) 슬라이드 페이지 (1) 버튼형 (0) | 2022.03.11 |


